Why aren’t you auto-paying all of your bills?

Quick read bullets:

  • Set up autopay AND paperless billing for all of your recurring bills, directing them to be paid in full by your credit card. Do this from the website of each individual company, and not your bank account’s bill pay software (unless that’s the only way you can do it.)
  • Pro tip: as you go, save the logins & passwords from each company’s site to Google Chrome or LastPass to avoid having to remember them, saving you time & avoiding frustration.
  • Next, set your credit card to autopay (and paperless billing) on the due date for the full balance. (Bonus points if you also change your credit card due date to the 4th or 5th of the month so that you can pay it right after your rent/mortgage. See my easy no-budget budgeting system for why this is a good idea.) If you are carrying a credit card balance and can’t pay it off in full yet, set your autopay to the minimum balance instead, and make extra payments on an ad hoc basis to pay down your balance ASAP.
  • You’ll still receive your bills via email (or paper, if you prefer) so you have plenty of time to check them and make sure they’re correct before the payments get made in case this worries you. You can cancel the autopay at any time, so there’s no risk of paying something you shouldn’t so long as you’re still checking your statements. (I don’t think I’ve ever once found an incorrect charge on my credit card, except once when my account info was stolen, but it doesn’t hurt to be vigilant!)

Why autopay everything?

Automation frees up your time and more importantly, your mental energy. You never have to worry about missing a bill or getting a late fee again. It keeps your financial system humming along, even while you’re on vacation or off the grid.

Does this look like your finances?

Why doesn’t everyone do this?

Some people are resistant to embracing autopay, so there’s definitely some psychology to overcome if you’re one of them. The resistance I get is usually something like: “I want to be in control/I don’t trust the autopay!”

My answer? You are still in control, and even more so since you’ll never miss a payment or get charged a late fee again now! You’ll see every bill show up in your email well before it gets paid, so you can still go through everything line by line to make sure the charges are legit if you want to. (I still do with my credit card statements.)

In the same amount of time it would have taken to pay the bill, you can easily login and cancel the autopay one time or permanently if you ever needed to. Autopay isn’t set in stone: it just changes your default behavior to paying all your bills in full and on time, and that is very good default behavior to have!

The most impactful financial advice I give is about setting up systems to make good financial things happen by default. Take advantage of this powerful technique wherever you can, and make life easier on yourself in the process.

How to set up autopay on everything

I start by putting all of my recurring bills like internet, phone, utilities, digital subscriptions, gym membership, car payment, auto insurance etc on my credit card using the autopay on the billing company’s site.

I use the company sites instead of my bank’s bill pay because

1) I want to use my credit card and

2) I think it’s more direct to pay straight to the billing company (no middle man to screw things up) and

3) it forces me to make sure I have online access and a remembered password to all of my financial sites, which is very important.

Once I’m done with setting everything to autopay with my credit card, I only have one bill per month hitting my checking account, which simplifies things when I glance at my checking account statements to see what I’m spending on a monthly basis.

If there are any bills that don’t let me, or would charge me extra to, use a credit card (public utilities, for example), I set up automatic ACH checking account withdrawals instead.

Setting up autopay on my internet bill

I log in to Comcast/Xfinity, then navigate to the billing area, and click the autopay link at the bottom left of the screenshot. For your bills, try googling ‘[company name] set up autopay’.

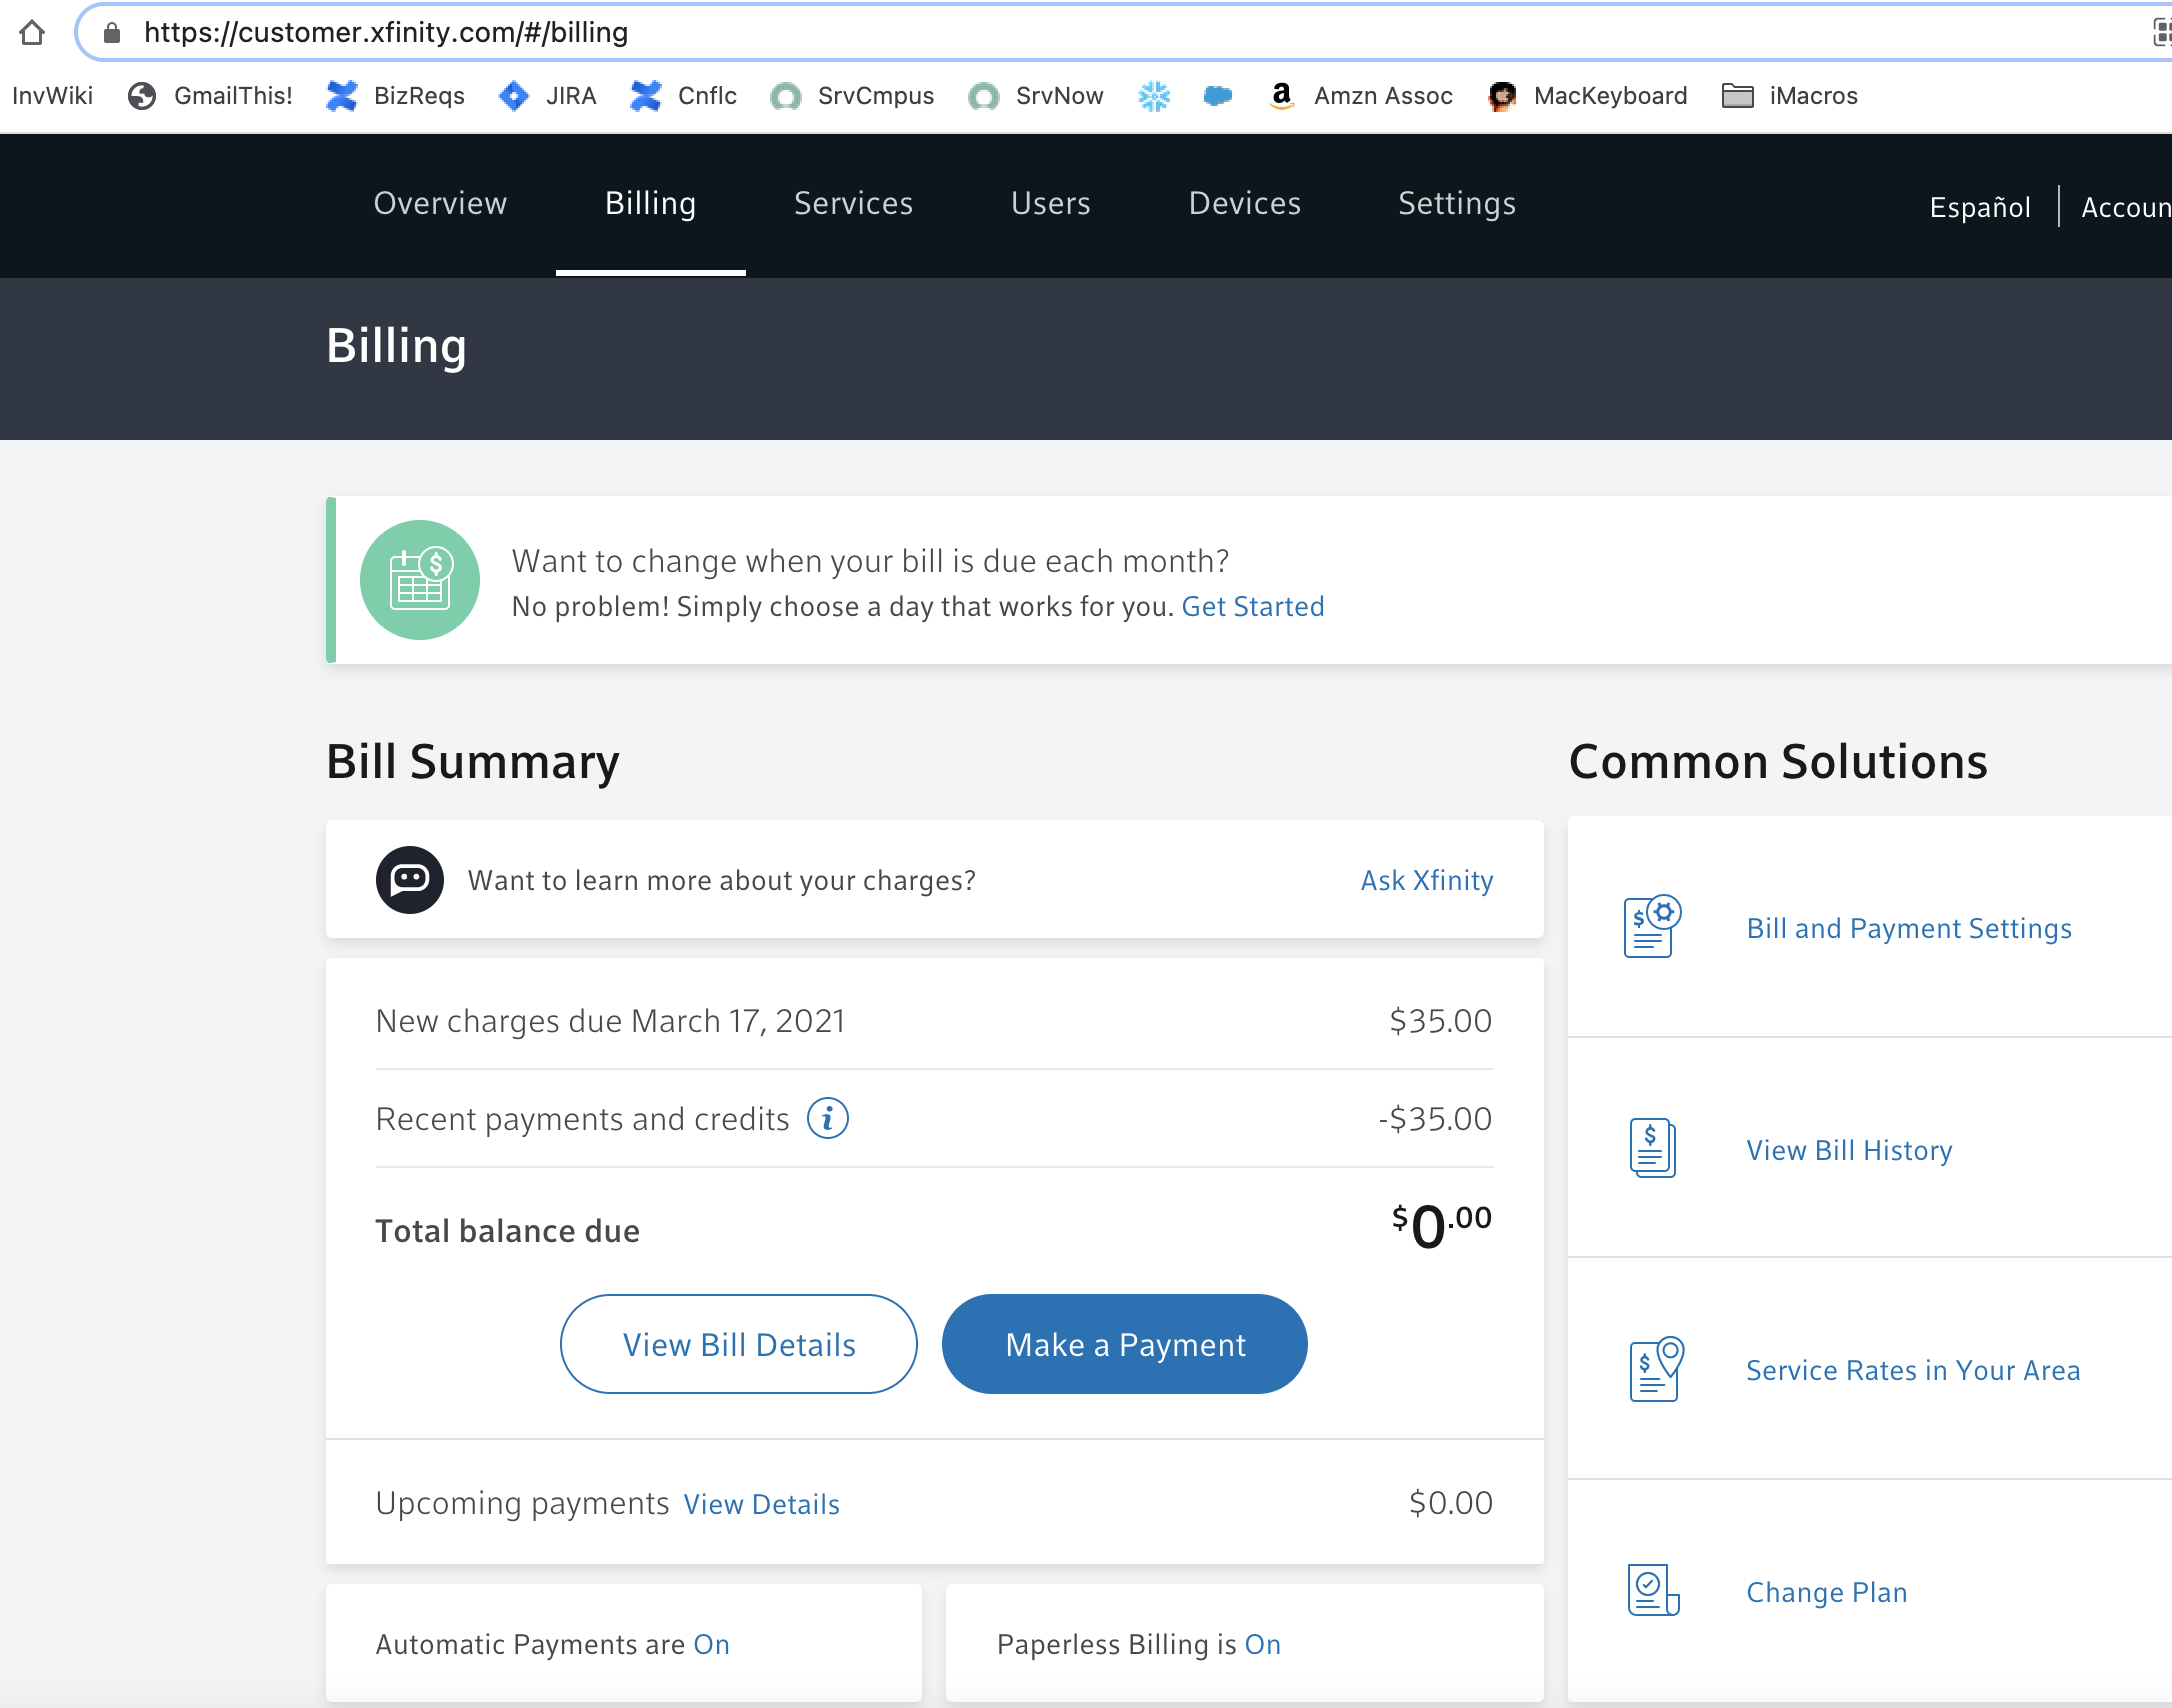
Then I add my credit card info (this is all perfectly safe; don’t worry!), and just follow the prompts to turn it on:

All set up! Now all I do is double-check the bill notification emails (which I set to paperless) to make sure I’m only paying my $35 and no more.

I do the same thing for all my other bills. Then I set up autopay on my credit card to pay the full bill each month on the due date.

If you have a balance you can’t pay off in full yet, set up autopay for the minimum balance to avoid any late fees on missed payments, and then make manual payments to pay down the balance ASAP.

From this screen I click ‘I want to’ and then look for the word ‘autopay’ to set it up

Once you’re done, you’ll have autopay set up looking something like this:

If my landlord or mortgage company offers electronic autopay, I set that up too, which will usually come straight from your checking account instead of your credit card. Every one I’ve dealt with over the past 5 or 6 years has had an autopay option, so yours probably does too.

If you use Capital One 360, you can even schedule a physical check to be mailed to any landlords that force you to use paper checks. Just log into your bank’s bill pay service to see what your options are. Zelle is another popular option for electronic bill pay that many banks use, including Capital One.

Your turn!

Take 30 minutes to do this yourself for all your bills, credit card, and then rent/mortgage. Afterward, you’ll have just a few monthly bills hitting your checking: 1) rent/mortgage, 2) credit card(s), maybe 3) a utility bill that you couldn’t use your credit card to pay, and 4) any cash or debit card transactions you have.

This makes it a lot easier to see your monthly spending.

*Boom!* You just saved yourself a ton of repetitive work logging into sites and making bill payments each month. You can check your emailed statements monthly to keep any eye on things, and then kick back and have a coffee or a whiskey (or a homebrewed cider!) while the machines do all the work!

Welcome to the 21st century! 🙂

Access files on your home computer form anywhere in the world (by setting up a home FTP server)

NOTE: I wrote this post in Word originally, cutting & pasting images into it.  I haven’t yet figure out how to import the Word doc WITH images (short of having to use WordPress’ laborious process of inserting each individual image from my hard drive.)

SO, to get this post with the pictures (highly recommended), just open this Word doc and read the post that way:

How to set up a home FTP server – Windows 7 – FileZilla Server

POST WITHOUT PICTURES (download the above instead):

Start here: http://lifehacker.com/339887/build-a-home-ftp-server-with-filezilla and read through the instructions to try to get a basic idea of what you’re doing.  Then, come back to this guide for some step-by-step instruction to implement what’s in the link.

Step 1) Download & run the FileZilla Server installation package: http://filezilla-project.org/download.php?type=server

–          Install with default IP (127.0.0.1) and port (14147) settings.  (‘Cause these settings aren’t ‘used’ anywhere else.)

–          (!) Configure ‘passive mode’ settings to range above 1024 (ex: 60000 – 61000)

–          Set up users & passwords, along with access folders for those users.

  • Create a master user for yourself, and maybe another ‘read-only’ one for ‘guests’

Step 2) Windows 7 Firewall: Control Panel > Firewall > Advanced > Out & In: 60000 – 61000, [20, 21]

Windows 7 Firewall settings:


–          Must allow the passive ports that are being used to go IN & OUT (Control Panel > Firewall > Advanced …)

–          TEST IT: Try to test with another computer on the network (use FileZila Client and enter the home server computer’s IP Address (NOT the web/public IP!), like 192.168.0.2 or .3.

  • Figure out your computer/server’s IP address by going to Start (Windows Ribbon) > Run, then type in ‘cmd’:

This opens the command prompt.  Type ‘ipconfig’ into the command prompt and hit ‘enter’:

  • The ‘IPv4 Address’ is the one you want in this case.  Other computers/operating systems might just say ‘IP Address’ or something close.  The number in the above case is 192.168.0.3.  Yours should always be something like 192.168.0.X.

Step 3) Port forwarding (or, making your router forward to your computer):

You will need to do this if your computer is ‘behind’ a router.  I.e.: if you use a router that’s connected to your computer to then connect to the internet

–          ‘Port Forwarding’ on your router: http://lifehacker.com/127276/geek-to-live–how-to-access-a-home-server-behind-a-routerfirewall?tag=softwaretop

–          Make sure to set up an administrator username & password (write it down somewhere safe so that you don’t forget it!) on your router.

Step 4) Set up a URL to associate with your router’s IP address at freedns.afraid.org

Set up web access to your router/server

–          This link gives you an overview of what you’re going to do, but uses a different site than the one I recommend.  Read this to understand what you’re doing, then do the same thing at freedns.afraid.org:

–          I set up a URL at the http://freedns.afraid.org site with the address of w………..com.  I chose to use a free subdomain from the list offered by freedns.afraid.org.

–          This URL address (w….com) forwards to my router’s IP address (97.126…… in this case):

–          You can find your router’s address by opening a web browser window and typing in 192.168.0.1 into your browser address bar and hitting ‘enter’.  Then, look for something like ‘Status’ in your router’s configuration page and find the ‘IP Address’ of your router.

–          (If I hadn’t blurred part of it out, you could see from the below screenshot that my router’s IP address matches what my ward.ignorelist.com URL is forwarding to, which is the whole point!  The URL you set up at freedns.afraid.org must forward to your router, and the router then forwards to your computer’s IP address, which allows you to get all the way to your home server from the internet.)

–           

Step 5) TEST WITH NO FIREWALL

–          A) Use http://www.ftptest.net to test with Windows 7 firewall TURNED OFF after getting the web access set up via the http://freedns.afraid.org site (choose your subdomain & then find your network’s public IP (located in your router software’s status by going to (typically) http://192.168.0.1 in your browser) to link it to your new subdomain name.)

–          B) Once you’re successful with part A (see screenshot below for what success looks like), turn your Windows firewall back ON and do the test again.

  • If you are NOT successful this time, go back to Step 2 and figure out what’s wrong with your firewall settings that’s preventing this from working.

This is what success looks like:

Step 6) Dynamic DNS updates

ONCE THINGS ARE WORKING…

Meaning you can connect from the internet (using the FTP test site) to your server, then you need to set up something to update your IP address that your URL forwards to automatically.

This is because your router’s IP Address is ‘dynamic’, meaning it changes periodically, like when you reset your router and/or modem, for example.  In order to keep the IP address that your URL forwards to consistent with your router’s actual IP address, you need a piece of software that runs on your computer which will update freedns.afraid.org periodically with your router’s latest IP address.

Get Dynamic DNS updates for your freedns.afraid.org account:

ALMOST DONE: You now should have everything set up to use unencrypted FTP from your home computer to the internet.

Test this out by setting up the FileZilla client from another computer that’s NOT on your home network (say, your computer at work) to connect to your FTP server using the site address (your freedns.afraid.org URL) and the user credentials that you set up in FileZilla Server in step 1.

Once you have the unencrypted FTP working, take one last step to enable Secure (i.e.: encrypted) FTP, just as a security precaution.  You should use Secure FTP anytime you’re sending information back and forth that you wouldn’t want anyone else to be able to see.  I recommend ALWAYS using SFTP if you can.

Step 7) MAKE THINGS SECURE (Optional, but highly recommended)

http://www.hosting.com/support/ftp/setting-up-filezilla-for-sftp

(From FileZilla client, use ‘Explicit TLS’ so that you don’t have to specify a port (21 will still be used)).

Note: I still allowed plain FTP so that I could keep testing, and in case I need to.  I created a 4096 bit key for good measure.

IF YOU WANT TO DISABLE YOUR SERVER, OR START IT AGAIN:

To stop/start FileZilla server, CTRL + ALT + DELETE > Windows Task Manager (it appears that the admin login is just for administrative maintenance, and is NOT a starting/stopping of the service itself):

Automating your finances (Ramit Sethi-style)

I’m a big fan of automation, especially for personal finance & investing (think automatic 401k withdrawals.)  A ‘classic’ video from Ramit Sethi is at the bottom of this post, outlining his approach to automating your money.  I recommend watching it (12 minutes) and trying to automate your own money to the extent possible.  It takes a little up-front effort (which you never have to leave your computer chair for), but it pays off big time in making life simpler & helping you effortlessly hit your financial goals.

Using INGDirect for online banking is a big step in the right direction on the automation front.  I use them to automatically mail out my monthly rent checks, and to automatically put pieces of my direct deposited-paycheck into various high-interest savings sub-accounts.  Here’s how I do it.

How I automate my money

I generally have a ‘cycle’ of automatic things that happen per each paycheck.  A certain percent goes to my 401k at Vanguard (and invested according to the index funds I picked.)  The remainder (minus taxes and insurance premiums) is direct-deposited into my ING checking account online.  Of that, a fixed dollar amount goes into a vacation sub-savings account, an account for money that I spend on myself to make more money, and to my no-ATM-fee Charles Schwab checking account that I use for miscellaneous cash needs.

Once a month, my rent check is automatically mailed out to my landlord from my ING checking.  All my other bills (including utilities, cell phone, internet, etc) have been set up to be automatically paid by my credit card.  Thus, I just have one automatic credit card payment out of my ING checking that occurs monthly.  (Some bills can be set up to automatically come out of your bank account if paying by credit card is not an option; but I prefer the latter for the simplicity.)

Anything left over is available for me to either spend (without feeling guilty since I’ve hit all my savings goals), or add to my savings.  If you know me, you can guess that I generally choose the latter, but every once and a while I loosen the purse strings and splurge on myself in the form of good beer or relatively-inexpensive travel.  (I know, I know, I’m a wild man when it comes to my spending sprees.)

Below is a picture from Ramit’s post (linked below) that illustrates how this works:

Having my money automatically going to various savings places BEFORE I get to spend it on discretionary items is part of the idea.  I’m ‘paying myself first’ as the mantra goes.  Of course, you’ll want to have a rough idea of your more ‘mandatory’ spending like rent/mortgage, utilities, gas, groceries, plus a little spending money so that you can estimate how much you can sock away.  If you want to have more money to save, scroll down to the 30 excellent tips in this post.

Ramit’s more detailed explanation

Ramit outlined the approach he discusses in the below video in a blog post here as well.

Working for yourself: how to get started as an entrepreneur

As a financial advisor who launched his own business, I have a strong interest in entrepreneurship.  Contrary to what you might think, no huge life-changing leap is required to start your own business.  I still kept my ‘day job’ while doing what I’m really passionate about during the other waking hours of my life.  In this post, I’ll discuss why you might want to work for yourself, the typical barriers that keep people from doing this, and how to discover what you can make money at.

Motivation

As a physics student in college, I had a kindly old professor that would start every lecture with what he called, in a funny Russian accent, ‘moh-teee-vaaaayyy-shun’, or why what we were about to learn was going to be valuable to us.  To me, the two key reasons for starting your own business are 1) freedom to do what you want, when/how/where you want and 2) money.

The first reason, freedom, is multi-faceted.  If you work for yourself, you get to set your own hours, write your own job description, pick your office space, and work in a way that makes the most sense to you.  The second reason, money, means that a side job can allow you to do things financially (retire sooner, pay off debt, plate yourself in gold) that you might not have been able to do otherwise.  Your own business can even eventually replace or surpass your current income, if that’s your goal.  Some schlub toiling away at a box factory isn’t likely to get rich, but many (though few per capita) hardworking entrepreneurs have.

Overcoming barriers to starting your own business

Many reasons, also known as ‘excuses’, are cited as making entrepreneurship difficult.  Some are valid, but others are just rationalized laziness (mental and physical.)  Because it’s fun to blame people, let’s start with the nonsense:

“I don’t have enough time to start a side business!”

I have a general premise that if you really want to do something, you can make time for it, regardless of how ‘busy’ you are.  The trick to good time management is to eliminate activities to make room for more important ones, and to focus on getting one important thing done at a time.  There are a number of good books and blogs on ‘personal productivity’. One book that I highly recommend everybody read (not just the entrepreneurs) is ‘The Power of Less‘ by Leo Babauta (he also has a blog.)  Tim Ferris also has some great posts on controlling your time and getting important things done.  His book, ‘The Four Hour Workweek‘, is already a classic treatise on how to live an accomplished life (however you define it.)

Let’s say you spend 50 hours per week at your full-time job (including lunch.)  Let’s also assume it takes you 45 minutes to commute each way, 5 days a week.  That’s 7.5 hours per week + 50 = 57.5 hrs for work.  Add in 8 hours of sleep per night (56/week), and that brings the total to 113.5.

There are 168 hours in a week, leaving you with 54.5 hours to do what you please.  Of these, maybe 3/day go to personal stuff like eating, bathing and getting ready for the day.  That leaves 33.5 hours.  Spending 2 hours per day with family & friends leaves 19.5 hours.  Even if you give yourself an hour of free time each day to read, watch TV, surf the internet, etc, that leaves you 12.5 hours.

So, even if you work more than 40 hours, have a long commute, spend lots of time with family & friends, sleep a full 8 hours, take time for meals, and sit on the couch an hour each night, you have at least 12.5 hours per week to spare, and nearly 20 if you cut out free time spent alone (be honest; you’re getting some of that web-surfing time in at work anyways.)

This is more than enough time to get a part-time freelance project going.  I started my business while working full-time and pursuing a graduate degree in business in the evenings.  Did I do this by cutting contact with family & friends while simultaneously stressing myself out?  No!  I still saw family & friends for a few hours at least once per week, got plenty of sleep, read, cooked, and got all my homework done.  I even took an awesome 11 day trip to the Czech Republic while on break from my MBA classes.

I DID make a conscious effort to set and complete small (written) goals each day that would get me closer to where I wanted to be.  These might have been designing a page of my website, filing my sole proprietorship business license online, or contacting & meeting with potential clients.

What I DID NOT do is just as important:  I didn’t spend much free time browsing the internet (when I was on the internet, it was to get something specific done), watching TV, playing video games or just lounging around.  I stopped going to the monthly meetings of an organization I had joined (and let everybody in the group know that I had to be firm on that.)  In a nutshell, I prioritized getting important things done at the expense of letting small things slip (I use this strategy at my ‘day job’ too; see the above-linked Tim Ferris articles for more on this idea.)

Even though I made sure to see friends & family, especially on weekend nights, I hung out with them less than I would if I had all the time in the world.  If you have something important you need to finish, you have to learn to say ‘no’ to requests for your time.

“I don’t have any money”

While it’s true that certain types of businesses require large upfront capital expenditures (like manufacturing), many can be started with no more than a phone, computer and some office supplies.  I have a friend who started a bakery in Seattle without investing much upfront by renting kitchen space by the hour (including the expensive equipment) and selling wholesale.  If, like me and many other people, you’re going to supply a service, you really don’t need much to get started.  If you do need cash, finance your venture out of your (non-retirement) savings or income, hit up relatives or friends for loans, or start saving a bit each month to get what you need.  Avoid buying anything you don’t absolutely need for the business.

Focus instead on generating cash from customers.  Ramit Sethi, my favorite personal finance blogger, recommends getting paid by at least 3 customers (1 could be a fluke) as a sign that your venture is viable.  Start marketing your services to friends, family, co-workers and the acquaintances of these folks, build a simple website, and stay focused on taking action towards your goals.

“But I don’t know what to do?”

After setting aside time and money (or lack thereof), many would-be entrepreneurs are stymied by not knowing what services or products to offer.  Sethi has posted a great video about this discovery process.  In general, you want to come up with a business venture that combines three things: 1) Interest – what you’re passionate about, 2) Skill – what you’re good at (you don’t have to be an expert), 3) Marketability – what people will actually pay for.

Digest Ramit’s video and start setting your entrepreneurial goals today:  ‘How to figure out what to do’ video

Here’s another video from Ramit on entrepreneurial goal-setting.